

| | |
| |
| ||||||
 |
Ngoài một số quy định đã được nêu trong phần Quy định của Ghi Danh , mọi người tranh thủ bỏ ra 5 phút để đọc thêm một số Quy định sau để khỏi bị treo nick ở MathScope nhé ! * Quy định về việc viết bài trong diễn đàn MathScope * Nếu bạn muốn gia nhập đội ngũ BQT thì vui lòng tham gia tại đây |
  |
| | Ðiều Chỉnh | Xếp Bài |
 15-11-2010, 03:18 PM 15-11-2010, 03:18 PM | #46 |
| +Thành Viên+  Tham gia ngày: Jul 2010 Đến từ: Sài Gòn Bài gởi: 30 Thanks: 55 Thanked 9 Times in 5 Posts | Cái đó mình không dùng, mình cũng có cái đó và thấy cài hơi rối thì phải nên không dùng. |
 |  |
| 17-11-2010, 10:23 AM | #47 |
| Super Moderator   Tham gia ngày: Apr 2009 Bài gởi: 696 Thanks: 8 Thanked 800 Times in 423 Posts | How to Install a Full MiKTeX LaTeX Installation and configure TeXnicCenter on Windows How to Install a Full MiKTeX LaTeX Installation and configure TeXnicCenter on Windows XP, Windows Vista and Windows 7 TeXnicCenter LogoThe purpose of this article is to outline in concise form the steps required to install and configure a full LaTeX distribution from scratch up to the point of editing documents in LaTeX on a Windows PC. Furthermore, I will show you how to integrate the LaTeX editor with the PDF viewer to enable you to switch seamlessly between them while creating your documents. The LaTeX editor employed here is the free open source TeXnicCenter editor which provides all the functionality you need to create, write, build, view and print your LaTeX documents. Adobe Reader iconPlease ensure you have a PDF viewer already installed before commencing the steps below. This article will provide instructions on how to configure and integrate two PDF viewers with our LaTeX editor: the free open source PDF viewer Sumatra PDF and the freeware Adobe Acrobat Reader. You may install either one (or both if you wish). This article provides instructions for the following platforms: Windows XP, Windows Vista and Windows 7. 1. Download and run the free open source MiKTeX Net Installer setup-2.X.xxxx.exe from the MiKteX download page. The MiKTeX installation consists of two phases: the first phase will download the MiKTeX distribution to your PC, the second phase will perform the actual installation. Once the download operation has finished, the first phase is complete and you are ready to install MiKTeX. It is recommended to download the latest stable version. At the time of writing, the latest stable version is 2.9. 2. To perform the second phase of the installation, start Windows Explorer and browse to the directory which contains the complete MiKTeX distribution (where you downloaded it). Look for a file named setup.exe. This is the MiKTeX Setup application. Run setup.exe by double-clicking its icon. When asked to select a repository folder, select the location of the downloaded MiKTeX distribution. Please be patient as the installation may take quite some time to complete. 3. Update the MiKTeX Installation: From the Start menu, 1. On Windows XP: select Start | Programs | MiKTeX 2.X | Update 2. On Windows Vista or Windows 7: select Start | Programs | MiKTeX 2.X | Maintenance (Admin) | Update (Admin) 3. Select the option: I want to get updated packages from a remote package repository and the option: Let me choose a remote package repository and select the repository nearest you. 4. Follow the onscreen instructions. 4. Update the MiKTeX Package Manager: From the Start menu, 1. On Windows XP: select Start | Programs | MiKTeX 2.X | Settings 2. On Windows Vista or Windows 7: select Start | Programs | MiKTeX 2.X | Maintenance (Admin) | Settings (Admin) 3. Select the option Refresh FNDB 4. Select the option Update Formats 5. Exit the application by clicking Ok. 5. Install TeXnicCenter: 1. Download the latest version of TeXnicCenter from http://www.texniccenter.org 2. Run the TeXnicCenter installer and follow the onscreen instructions. 6. Configure TeXnicCenter’s initial settings: 1. When running TeXnicCenter for the first time, follow the onscreen instructions. 2. Close and rerun TeXnicCenter. 3. Select Tools | Options | Editor Tab Enable display line numbers 7. If you are running Windows Vista or Windows 7: 1. Configure the TeXnicCenter application to run as an administrator. 2. Configure the TeXnicCenter application to run in compatibility mode: Windows XP SP3. 3. If you will use Sumatra PDF as your PDF viewer, configure the Sumatra PDF application to run in compatibility mode: Windows XP SP3. 8. A brief explanation of terminology concerning Integration features between TeXnicCenter and the PDF viewers is now required. Several PDF viewers support the concept of Forward-Search and Inverse-Search. * What is Forward-Search?: When compiling (generating PDF output) your LaTeX source document in TeXnicCenter, Forward-Search enables the current editing location in the source latex file to be displayed and highlighted in the generated PDF. The communication between the editor and PDF viewer often relies on the DDE protocol. * What is Inverse-Search?: Inverse-Search is a synchronisation feature whereby doubling-clicking on a line in the PDF document will switch to the LaTeX editor and display the corresponding line in the document source. * Adobe Reader and Adobe Acrobat: Forward-Search and Inverse-Search may not work with adobe Reader version 8 or higher (i.e.: all recent versions). * Sumatra PDF Viewer: Forward-Search and Inverse-Search function correctly using Sumatra PDF on Windows XP SP3, Windows Vista and Windows 7. Note 1: At present (TeXnicCenter v1.0 and Sumatra V1.0.1), forward search only works if the file name and entire file path do not contain spaces! Note 2: Be aware that cutting and pasting the configuration information that appears in the subsequent steps from this webpage directly into the TeXnicCenter configuration panel may not work. The double-quotes (and single-quotes) are often misrepresented. 9. To configure TeXnicCenter to view document output using Adobe Reader: 1. Run TeXnicCenter. 2. Select Build | Define Output Profiles | Viewer Tab 3. Ensure the profile selected is LaTeX => PDF For both View Project’s Output and Forward Search options, enter the following: 1. Enable DDE 2. Command: [DocOpen("%bm.pdf")][FileOpen("%bm.pdf")] 3. Server: acroview 4. Topic: control 4. For Close Document before running LaTeX: 1. Enable DDE 2. Command: [DocClose("%bm.pdf")] 3. Server: acroview 4. Topic: control 10. To configure TeXnicCenter to view document output using Sumatra PDF: The Sumatra PDF viewer integrates nicely with TeXnicCenter supporting both forward-search and inverse-search. 1. Run TeXnicCenter. 2. Select Build | Define Output Profiles | (La)Tex Tab 1. Select Add to add a new profile. Enter the profile name: Latex => PDF (Sumatra) 3. Under the (La)TeX Tab 1. Select the checkbox: Run (La)TeX compiler 1. Path to the latex compiler: C:\software\MiKTeX 2.8\miktex\bin\pdflatex.exe Note: The path references may be different on your computer. 2. Command line arguments to pass to the compiler: -interaction=nonstopmode “%pm” -synctex=-1 2. Unselect the checkbox: Do not use BibTeX in this profile 1. Path to BibTeX executable: C:\software\MiKTeX 2.8\miktex\bin\bibtex.exe 2. Command lne arguments to pass to BibTeX: “%bm” 3. Unselect the checkbox: MakeIndex 1. Path to MakeIndex executable: C:\software\MiKTeX 2.8\miktex \bin\makeindex.exe Note: The path should be on one line, I split the path here to ensure it displays clearly. There should be no space at the line break between miktex and \bin. 2. Command line arguments to pass to MakeIndex: “%bm” 4. The Postprocessor tab may be left blank. 5. Under the Viewer Tab: 1. Path to executable: C:\software\SumatraPDF\SumatraPDF.exe -inverse-search “\”C:\software\TeXnicCenter\TEXCNTR.EXE\” /ddecmd \”[goto('%f','%l')]\”" Note: The path should be on one line, I split the path here to ensure it displays clearly. There should be a space inserted at the position of the line breaks: * one space after SumatraPDF.EXE * another space after TEXCNTR.EXE\“ 2. For View project’s output: 1. Enable Command line argument 2. Command: “%bm.pdf” 3. For Forward Search: 1. Enable DDE command: 2. Command: [ForwardSearch("%bm.pdf","%Wc",%l,0)] 3. Server: sumatra 4. Topic: control 4. For Close document before running (La)Tex 1. Enable Do not close. 11. Well Done! You are now ready to create beautifully typesetted PDF documents. Enjoy! |
| | |
| 22-11-2010, 05:50 PM | #48 |
| +Thành Viên+   Tham gia ngày: Apr 2010 Bài gởi: 300 Thanks: 35 Thanked 307 Times in 151 Posts | Khi mình cài Mitex vào máy thì nó bị lỗi như thế này  Vậy là bị gì vậy? và sửa như thế nào ? __________________ Nguyen Van Huyen Ho Chi Minh City University of Transport |
| | |
| 22-11-2010, 08:19 PM | #49 |
| Super Moderator Tham gia ngày: Apr 2009 Bài gởi: 696 Thanks: 8 Thanked 800 Times in 423 Posts | File cài đặt bị lỗi, Xóa thư mục đã cài dang dở, download file setup mới bằng đường truyền tốt rồi cài lại. |
| | |
| The Following User Says Thank You to hungchng For This Useful Post: | Nguyenhuyen_AG (23-11-2010) |
| 23-11-2010, 09:03 PM | #50 | |
| +Thành Viên+ Tham gia ngày: Apr 2010 Bài gởi: 300 Thanks: 35 Thanked 307 Times in 151 Posts | Trích:
 __________________ Nguyen Van Huyen Ho Chi Minh City University of Transport | |
| | |
| 23-11-2010, 09:17 PM | #51 | |
| Super Moderator Tham gia ngày: Apr 2009 Bài gởi: 696 Thanks: 8 Thanked 800 Times in 423 Posts | Trích:
| |
| | |
| 09-04-2011, 04:09 PM | #52 |
| Super Moderator Tham gia ngày: Apr 2009 Bài gởi: 696 Thanks: 8 Thanked 800 Times in 423 Posts | Header/Footer trong Latex với Fancyhdr Tạo headers và footers trong Latex có thể được thực hiện bằng cách sử dụng gói “fancyhdr”. Đây là một giới thiệu ngắn, hiển thị các tính năng quan trọng nhất của gói. Nếu bạn muốn biết rõ "fancyhdr" và tìm kiếm ví dụ cụ thể hãy tham khảo tài liệu-fancyhdr. Trước hết, bạn cần phải khai báo với Latex dùng gói: Code: \usepackage{fancyhdr} Code: \pagestyle{fancy} Mặc định fancyhdr page style: Trên cùng, Latex sẽ in headers: Book/report Bên trái: đoạn Bên phải: chương Ghi chú: nếu bạn sử dụng đối số tùy chọn của documentclass “twoside”, Latex sẽ làm thay đổi vị trí của các đoạn và chương. (ví dụ \documentclass[twoside]{report}, cũng sử dụng lề không đối xứng). Acticles Đối với acticles, LaTeX sẽ in các đoạn (chương không được sử dụng với acticles). Footer này chỉ bao gồm số trang ở giửa theo mặc định. Cá nhân hóa fancyhdr page style: Mặc dù fancyhdr có page style mặc định, bạn được tự do xác định headers/footers cho chính bạn , điều này không quá khó khăn với tất cả. Trước tiên, bạn cần xóa các bố trí mặc định: Code: \fancyhead{}
\fancyfoot{} Code: E: Even page O: Odd page L: Left field C: Center field R: Right field H: Header F: Footer Code: \fancyhead[CO,CE]{---Dự thảo---}
\fancyfoot[CO,CE]{Bí mật}
\fancyfoot[RO, LE] {\thepage} Code: \renewcommand{\headrulewidth}{0.4pt}
\renewcommand{\footrulewidth}{0.4pt} Code: \fancyhead[LE,RO]{\slshape \rightmark}
\fancyhead[LO,RE]{\slshape \leftmark}
\fancyfoot[C]{\thepage}
\headrulewidth 0.4pt
\footrulewidth 0 pt |
| | |
| The Following User Says Thank You to hungchng For This Useful Post: | mrbin1262006 (15-04-2011) |
| 10-04-2011, 10:32 AM | #53 | ||
| Super Moderator Tham gia ngày: Apr 2009 Bài gởi: 696 Thanks: 8 Thanked 800 Times in 423 Posts |
| ||
| | |
| The Following 2 Users Say Thank You to hungchng For This Useful Post: | materazzi (10-04-2011), mrbin1262006 (15-04-2011) |
| 15-04-2011, 09:24 AM | #54 |
| +Thành Viên+ Tham gia ngày: Oct 2008 Bài gởi: 12 Thanks: 12 Thanked 0 Times in 0 Posts | [Help] Định dạng tiêu đề: Chapter; section, subsection Mình mới bắt đầu tập dùng tex, hiện đang sử dụng vietex + miktex tuy nhiên có một thắc mắc như sau: Mình muốn định dạng lại: font, fontsize, fontcolor cho các tiêu đề: Chương, mục trong mẫu làm sách (vietex - Thầy Điển) nhưng không biết can thiệp vào phần nào. Ví dụ: Gõ \chapter{CẤU TẠO VẬT RẮN} \section{Hệ điều hành} \subsection{Các đời máy tính} thì cho kết quả: Chương I CẤU TẠO VẬT RẮN 1.1 Hệ điều hành 1.1.1 Các đời máy tính Ai biết xin chỉ dùm, email: [Only registered and activated users can see links. ] Chân thành cảm ơn! |
| | |
| 15-04-2011, 02:22 PM | #55 | |
| Super Moderator Tham gia ngày: Apr 2009 Bài gởi: 696 Thanks: 8 Thanked 800 Times in 423 Posts | Trích:
Xem tại đây http://nhdien.wordpress.com/2009/07/...-titletoc-sty/ thay đổi nội dung bởi: hungchng, 15-04-2011 lúc 02:45 PM | |
| | |
| 15-04-2011, 02:54 PM | #56 |
| +Thành Viên+  Tham gia ngày: Mar 2011 Đến từ: Khu ổ chuột có cái view nhìn ra biển Bài gởi: 74 Thanks: 52 Thanked 37 Times in 24 Posts | Không biết có nên tải bộ tex này về không Hiện giờ cloner đang dùng mathtype + word soạn thảo các tài liệu, nhìn chung dễ dàng và tiện dụng như soạn thảo 1 văn bản bình thường bằng word vậy. Sau đó dùng soft convert sang pdf ... Mọi người xem thử file đính kèm làm theo cách trên (hàng fake thôi p/s Phải học code là nản rồi  __________________ MỌI NGƯỜI ƠI VÀO GIẢI MẤY BÀI NÀY NÈ  http://forum.mathscope.org/showthread.php?t=39613 http://forum.mathscope.org/showthread.php?t=39567 thay đổi nội dung bởi: cloner, 15-04-2011 lúc 02:57 PM |
| | |
| 16-04-2011, 10:42 AM | #57 | |
| +Thành Viên+ Tham gia ngày: Oct 2008 Bài gởi: 12 Thanks: 12 Thanked 0 Times in 0 Posts | Trích:
Mình đã mày mò được lệnh cấu trúc lại + tô màu nhưng chỉ tô được: chapter, section, subsection cùng màu, nếu mỗi phần 1 màu thì nó ko chạy. Mình có chế lại 1 chút mẫu làm sách của thầy Điển. [Only registered and activated users can see links. ] Sử dụng gói titledot + titlesec độ lại thì tô màu được. Code: %\===Định dạng, tô màu tiêu đề Chương=======================
\usepackage{titlesec}
\titleformat{\chapter}[frame]
{\Large}
{\filright
\Large
\enspace Chương \thechapter\enspace}
{16pt}
{\Huge\bfseries\filcenter \textcolor[rgb]{1.0,0.0,0.0}}
\titleformat{\section}
{\normalfont\Large\bfseries }{\thesection}{1em}{\textcolor[rgb]{1.0,0.0,0.0}}{}
\titleformat{\subsection}
{\normalfont\large\bfseries}{\thesubsection}{1em}{\textcolor[rgb]{1.0,0.0,0.0}}{}
\titleformat{\paragraph}[runin]
{\normalfont\normalsize\bfseries}{\theparagraph}{1em}{}
\titleformat{\subparagraph}[runin]
{\normalfont\normalsize\bfseries}{\thesubparagraph}{1em}{}
\usepackage{titledot} | |
| | |
| 16-04-2011, 09:01 PM | #58 |
| Super Moderator Tham gia ngày: Apr 2009 Bài gởi: 696 Thanks: 8 Thanked 800 Times in 423 Posts | Tôi edit lại của em như sau Code: \usepackage{titlesec}
\titleformat{\chapter}[frame]{\Large}{\filright\Large\enspace Chương\thechapter\enspace}{16pt}{\Huge\bfseries\filcenter \textcolor{red}}
\titleformat{\section}{\normalfont\Large\bfseries }{\thesection}{1em}{\textcolor{blue}}{}
\titleformat{\subsection}{\normalfont\large\bfseries}{\thesubsection}{1em}{\textcolor{green}}{}
\titleformat{\paragraph}[runin]{\normalfont\normalsize\bfseries}{\theparagraph}{1em}{}
\titleformat{\subparagraph}[runin]{\normalfont\normalsize\bfseries}{\thesubparagraph}{1em}{} 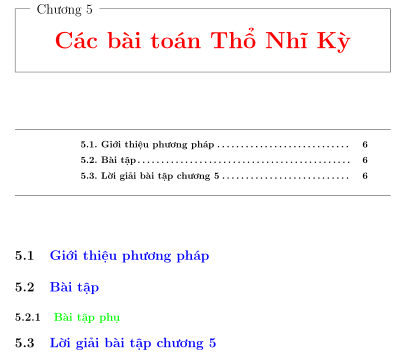 thay đổi nội dung bởi: hungchng, 16-04-2011 lúc 09:35 PM |
| | |
| The Following User Says Thank You to hungchng For This Useful Post: | mrbin1262006 (17-04-2011) |
| 17-04-2011, 04:03 PM | #59 |
| +Thành Viên+ Tham gia ngày: Oct 2008 Bài gởi: 12 Thanks: 12 Thanked 0 Times in 0 Posts | Cảm ơn Mod: Hungchng nhiều, vậy là do mình thêm op chưa chuẩn. |
| | |
| 17-04-2011, 09:47 PM | #60 |
| Super Moderator Tham gia ngày: Apr 2009 Bài gởi: 696 Thanks: 8 Thanked 800 Times in 423 Posts | TeXmaker 3.01 mới tinh, miễn phí. TexMaker một chương trình editor miễn phí và nhiều chức năng cho LaTeX  link download cho HDH Windows http://www.xm1math.net/texmaker/download.html#windows |
| | |
 |
| Bookmarks |
|
|


 Chế độ bình thường

